 TzInstruments - GPS Vario
Tz GPS Vario Manual Quick How To
- Power On
- Power Off
- Battery Management
- Pages
- Speaker Volume
- SD Card
- GpsDump
- Wifi Configurator
- Troubleshooting
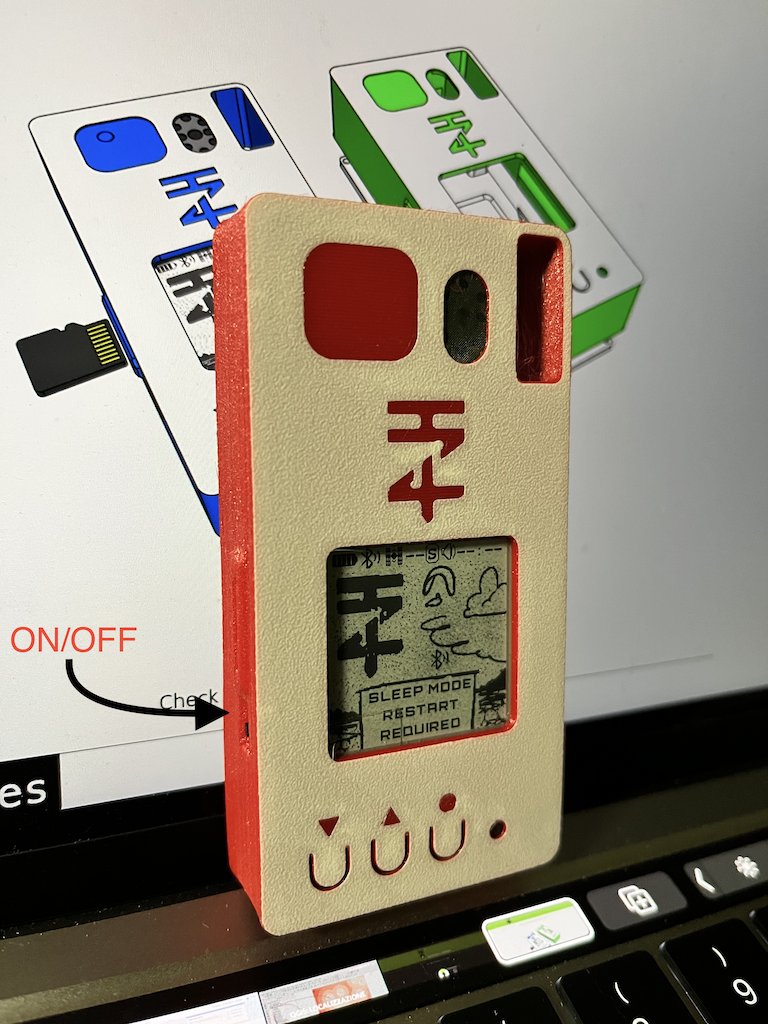
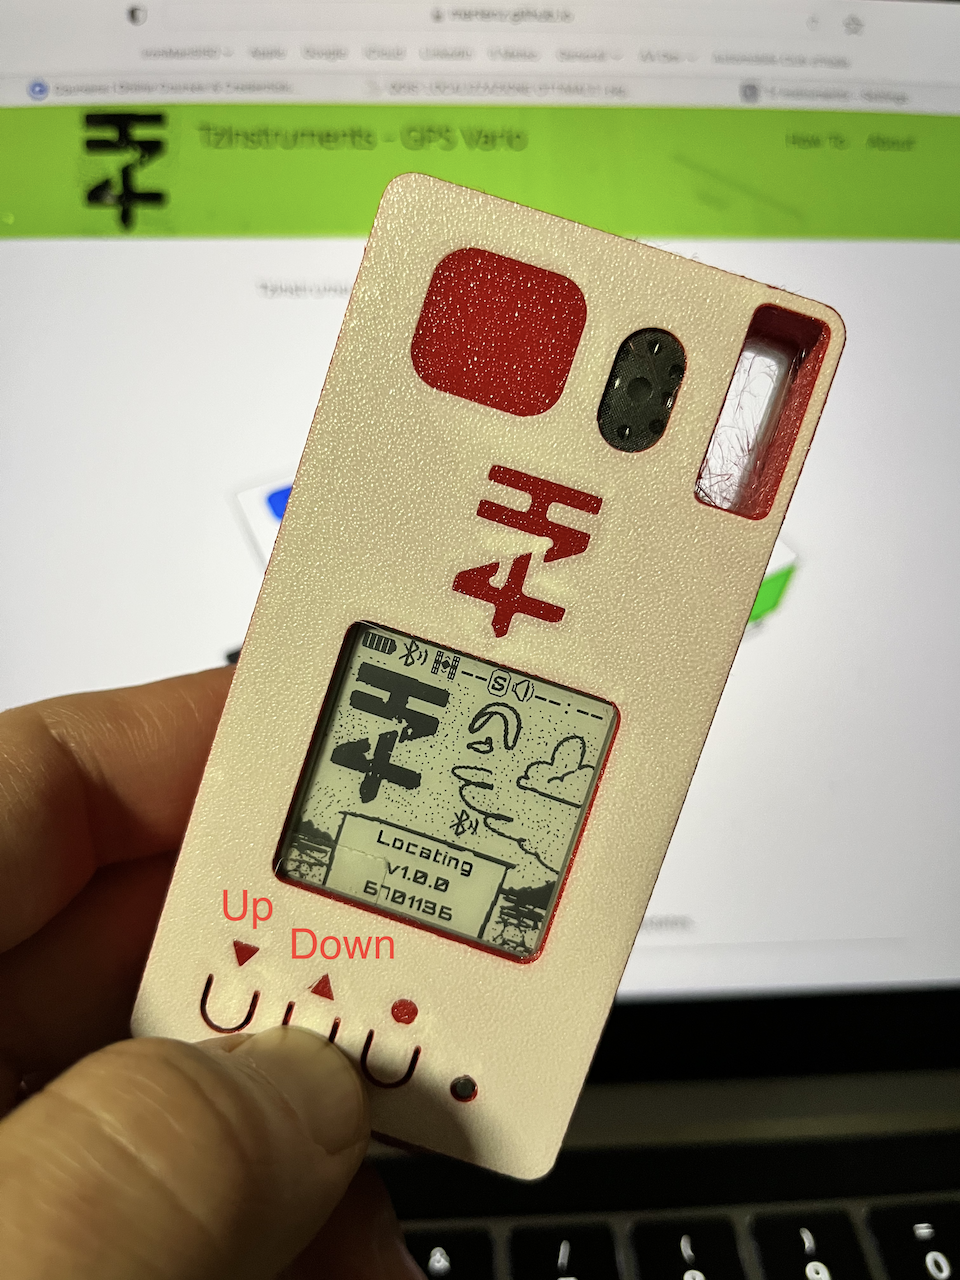
Power On/Off
Switch on the left side (latest cases have the I/O printed on front):
- Up is on
- Down is Off
Don’t rely on Epaper image because when shut down it will keep the last image displayed until you switch on again the device.
Eg. TzI on/off
Sleep Mode
You can enter in deep sleep while pressing the third button (Page button) for more than 5 seconds.
Sleep Mode can be used to keep the device listening to satellites, when needed you can press
- the page button
- the reset button
- switch up and down
to restart the device with gps already fixed.
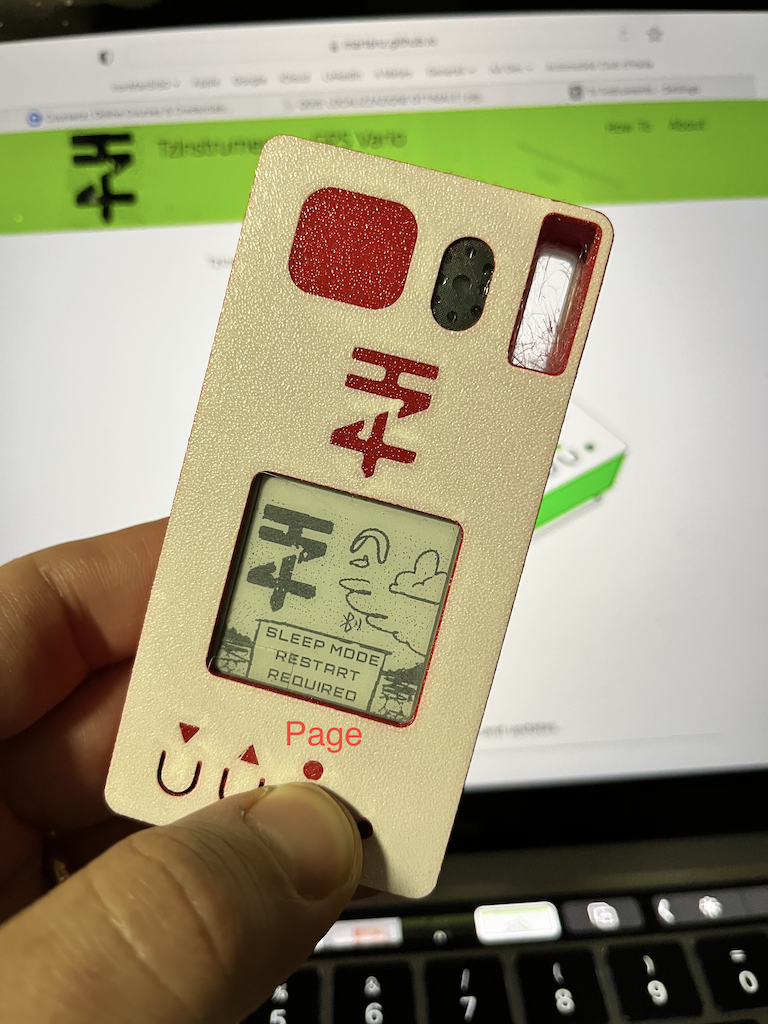
Note: this will comsume less battery but still if you forget it like that you might ruin the battery life. Use it only for short period of time. The GPS can keep satellite constellation up to 30 minutes while off to restart and get a fix in few seconds.
Battery Management
I tested the instrument with Lipo 1s batteries 3.7v:
TzI model:
- 1000mA last 4/5 hours
- 2000mA last 9/10 hours
TzIGx model:
- 1000mA last 2/3 hours
- 2000mA last 5/7 hours
Charge should be done with 5v charger and low mA input with micro-USB plug. Any USB old charger eg. 500mA ( best option ) max 1A will work, avoid to use USB fast chargers that can overheat the board.
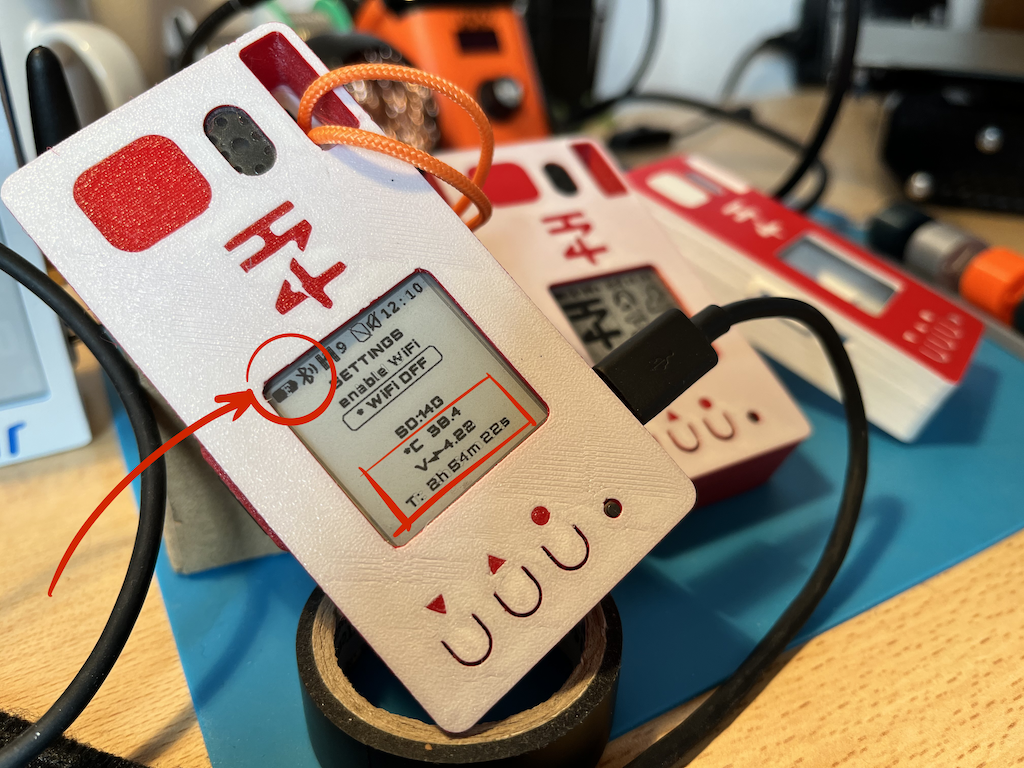
Full charge with 2000mA battery takes around 3 hours, when fully charged the voltage should be 4.20/4.30. Please check also temperature while charging, if you see on display values above 45 C degrees try with a lower output charger.
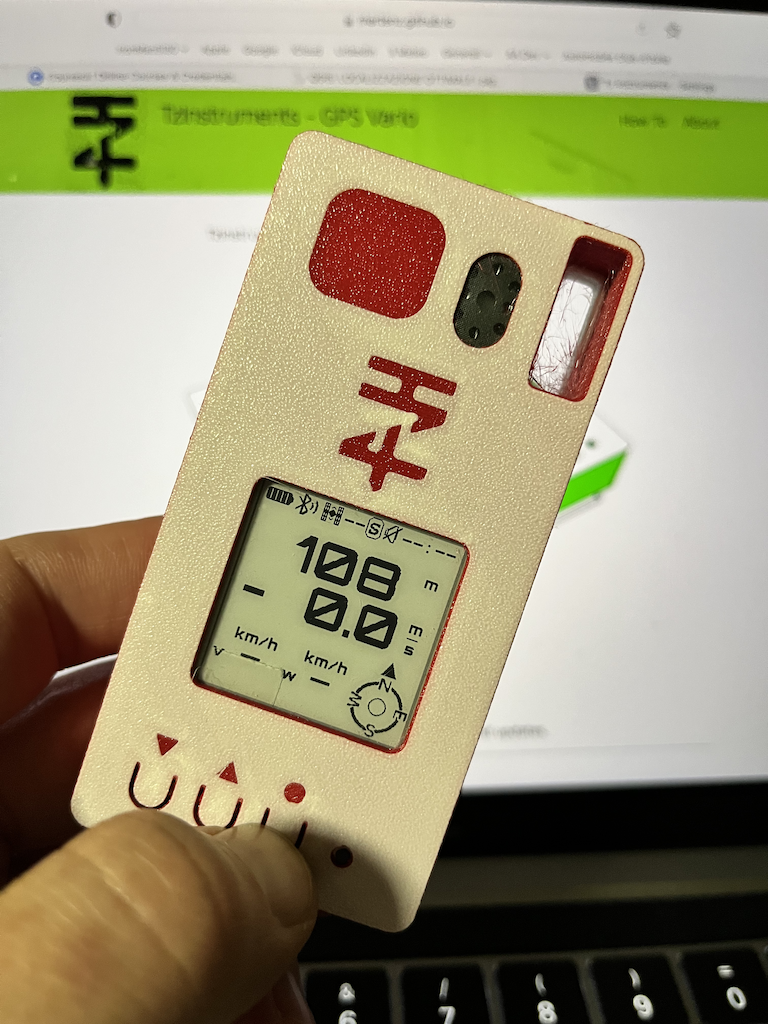
Pages
Press page button (3rd from the left O ) to move to next page. In all pages on top you will see a Status Bar on top including:
- battery %
- Bluetooth BLE connectivity
- GPS satellites count
- flying status: S = seat, F = flying, empty=logger disabled
- Vario sound volume On/Off
- current date hh:mm with UTC
The Three Pages
-
First page is the main one displaying your ID, if gps is locating or got a fix » Ready will appear
Hold in this page the page button >= 3 seconds to: activate sleep mode
- Page 2 is the Data page:
- Altimeter (GPS if got a fix, Barometric if not) m.a.s.l.
- Variometer m/s
- Ground speed km/h
- Wind Speed km/h [ work in progress, need some calibration ]
- Course direction N, E, S, W wheel
- Wind direction, arrow pointing inside of the course wheel
Hold in this page the page button >= 3 seconds to: disable flight logger, the icon on status bar will display an empty square with a line on top; if you already landed and want to stop immediately the flight record without wating the default 30 seconds, this is the proper way. Then to enable again flight log just hold again the page button for 3 s in this page.
-
Page 3 is the settings page
here you can hold and press the page button to enable and disable Wifi. Once WiFi is on:
- connect to TzI WiFi with a PC, Tablet or your phone
- visit 192.168.4.1 to access the full configuration of TzI
Speaker Volume
Arrow up once: volume +up
Arrow up 3 seconds: volume max
Arrow down once: volume -down
Arrow down 3 seconds: voleme off
SD Card
SD card should be formatted as FAT32 before using it with TzI instruments. Insert SD card before switch on the device with pin connectors facing up as shown in the picture on the homepage.
GpsDump
Export igc tracks to XContest. I meanly use this when something goes wrong with my track recorded on my tablet connected through BLE to the TZI or TzIGx. So I use the SD recorded IGC as backup.
Here below how to load the igc track that you should have downloaded from the wifi web interface to your Android device where you should have also intalled
 GpsDump application
Here also the latest Microsoft application GPSDump you can download and run from your desktop PC. Please use Version 5.41 or later that include TzInstruments compatibility.
Windoows Export
- Once downloaded run the GpsDumpVVV.exe
-
From File select Process log from TzInstruments
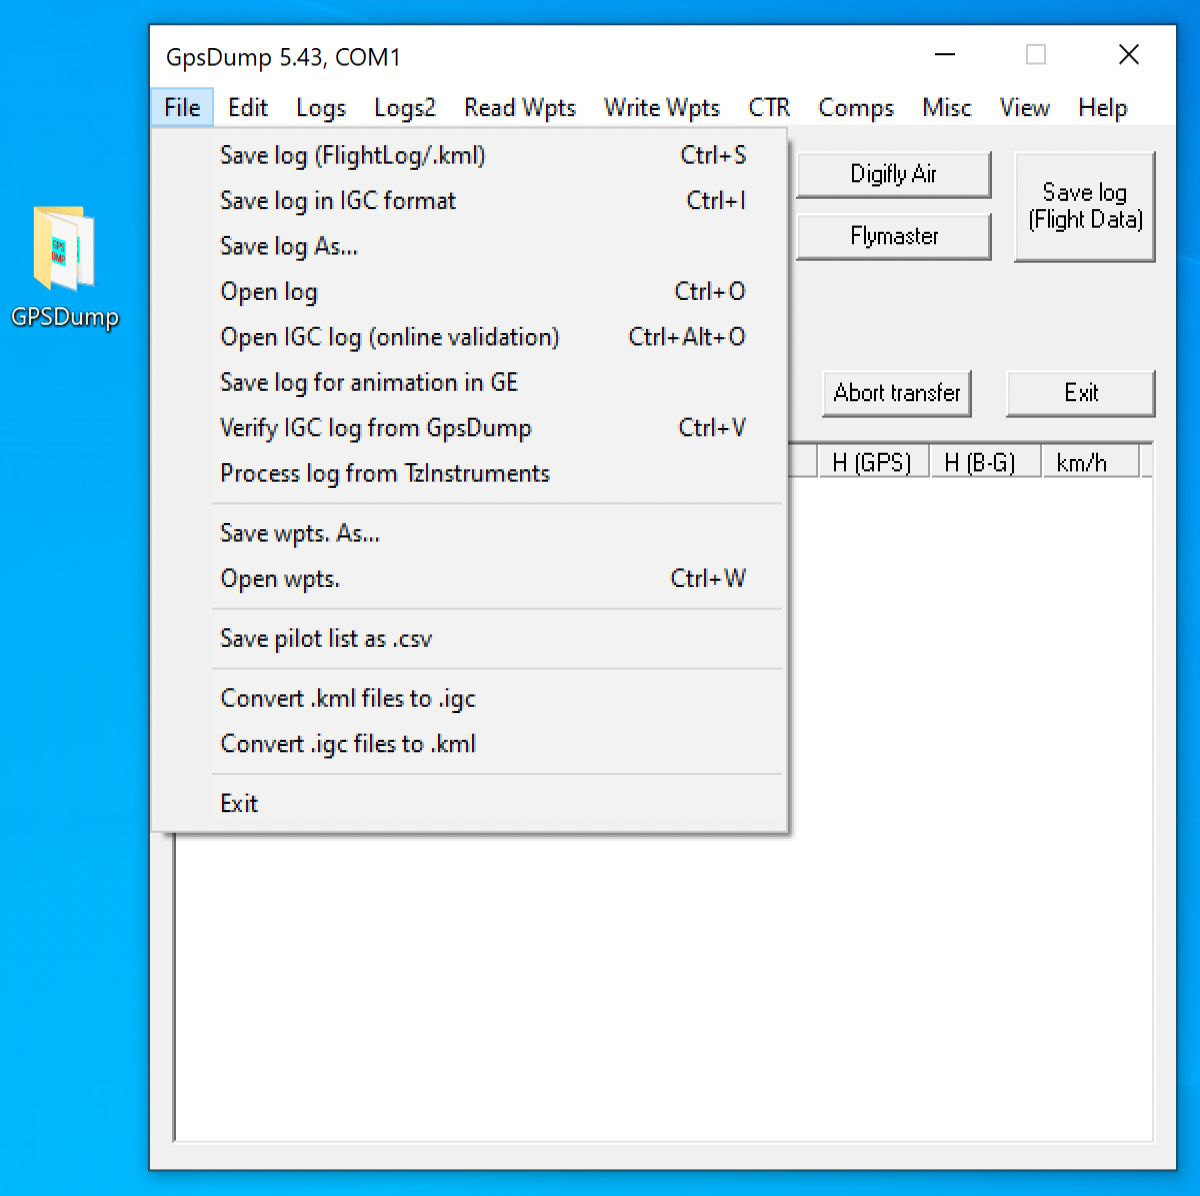
-
This will open a file browser to ask you the input TzI/TzIGx .igc file ypou should have donwloaded previously from the TzI/TzIGx web inteface
-
Once loaded GpsDump will ask you to save the converted and verified .igc file to your desired location
- Finally open XContest and load into your Flight Claim the converted .igc file
Android Export
-
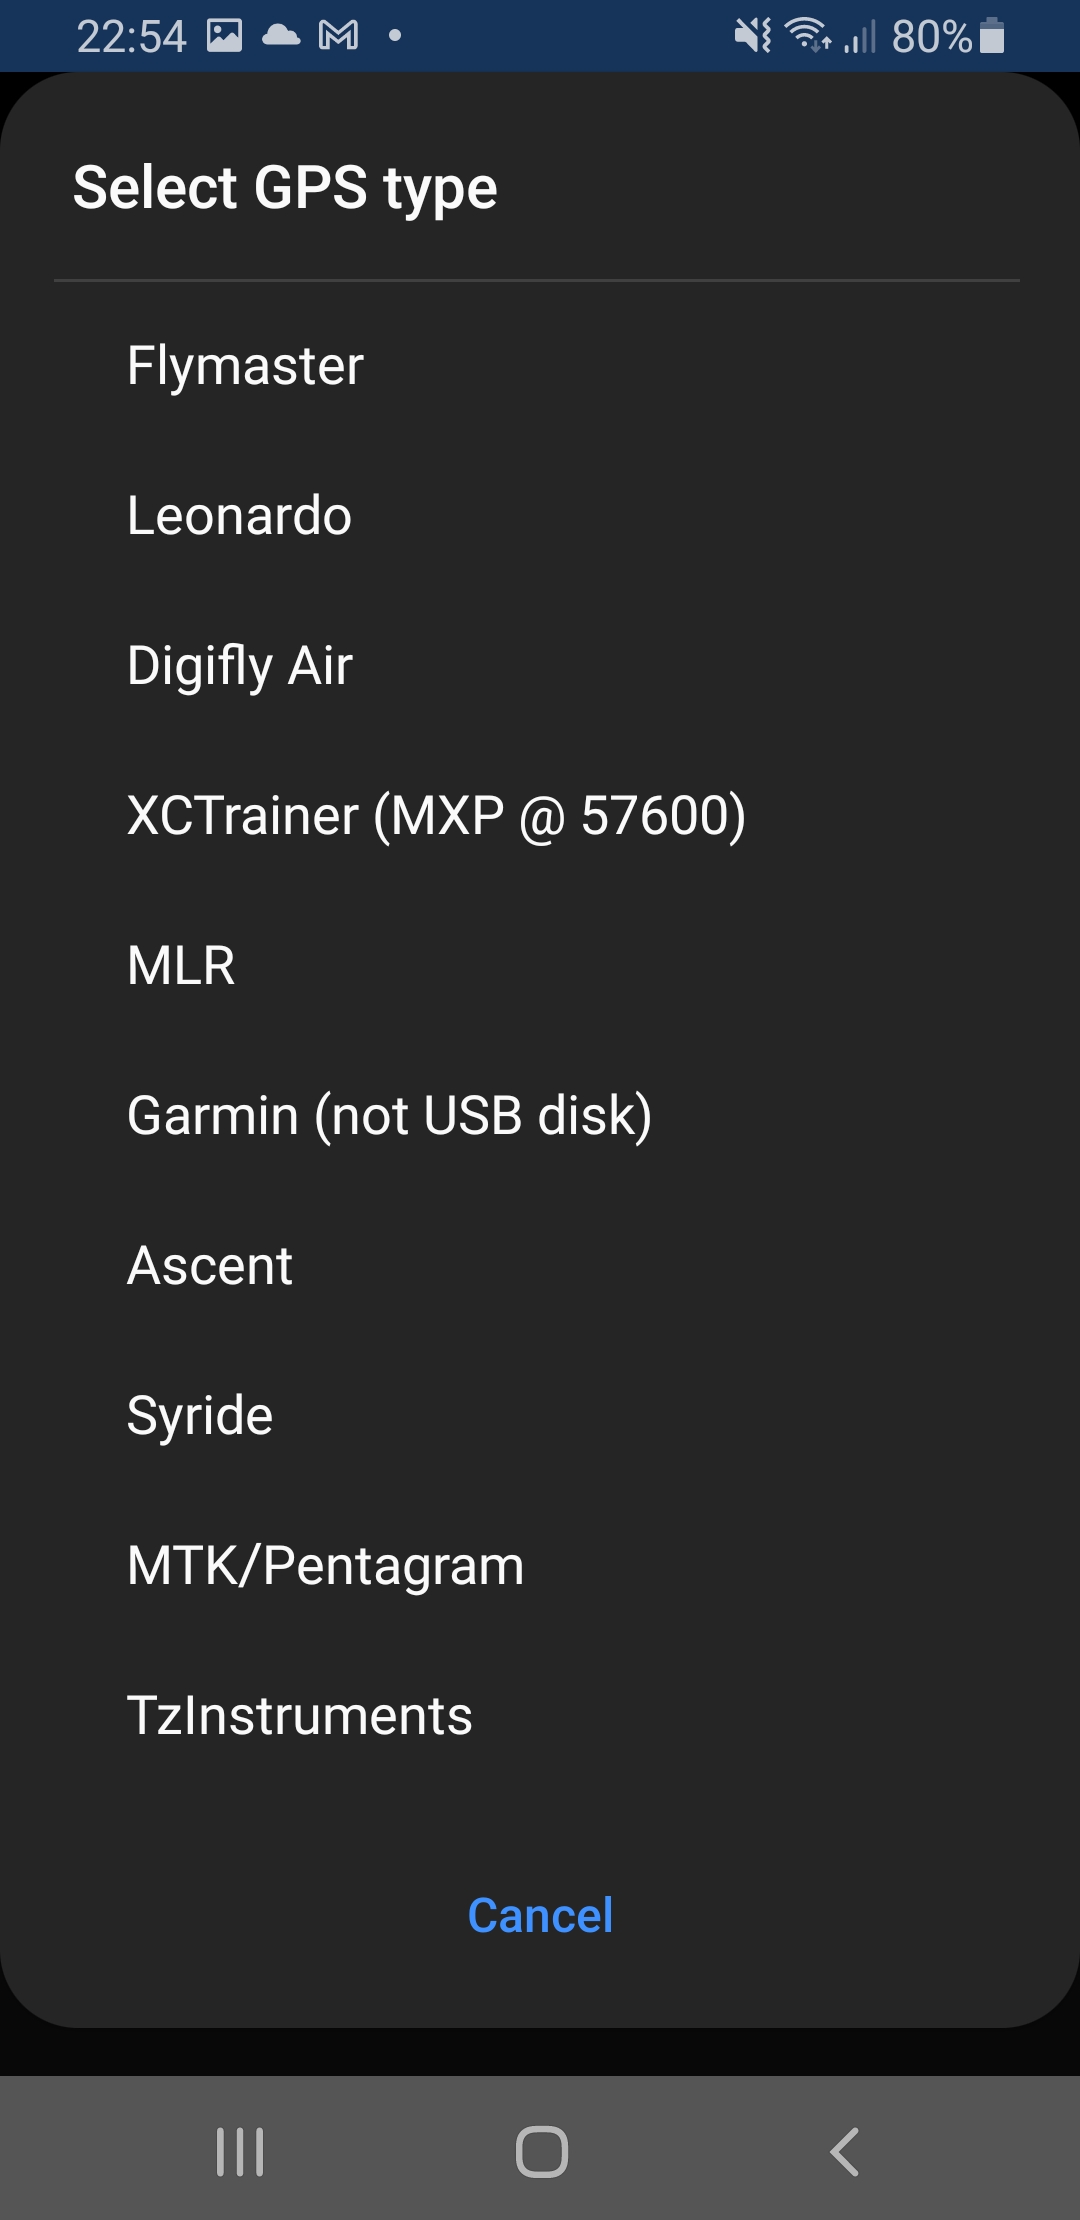
Open GpsDump Application and click on first tab TRK and click on first button to set GPS input
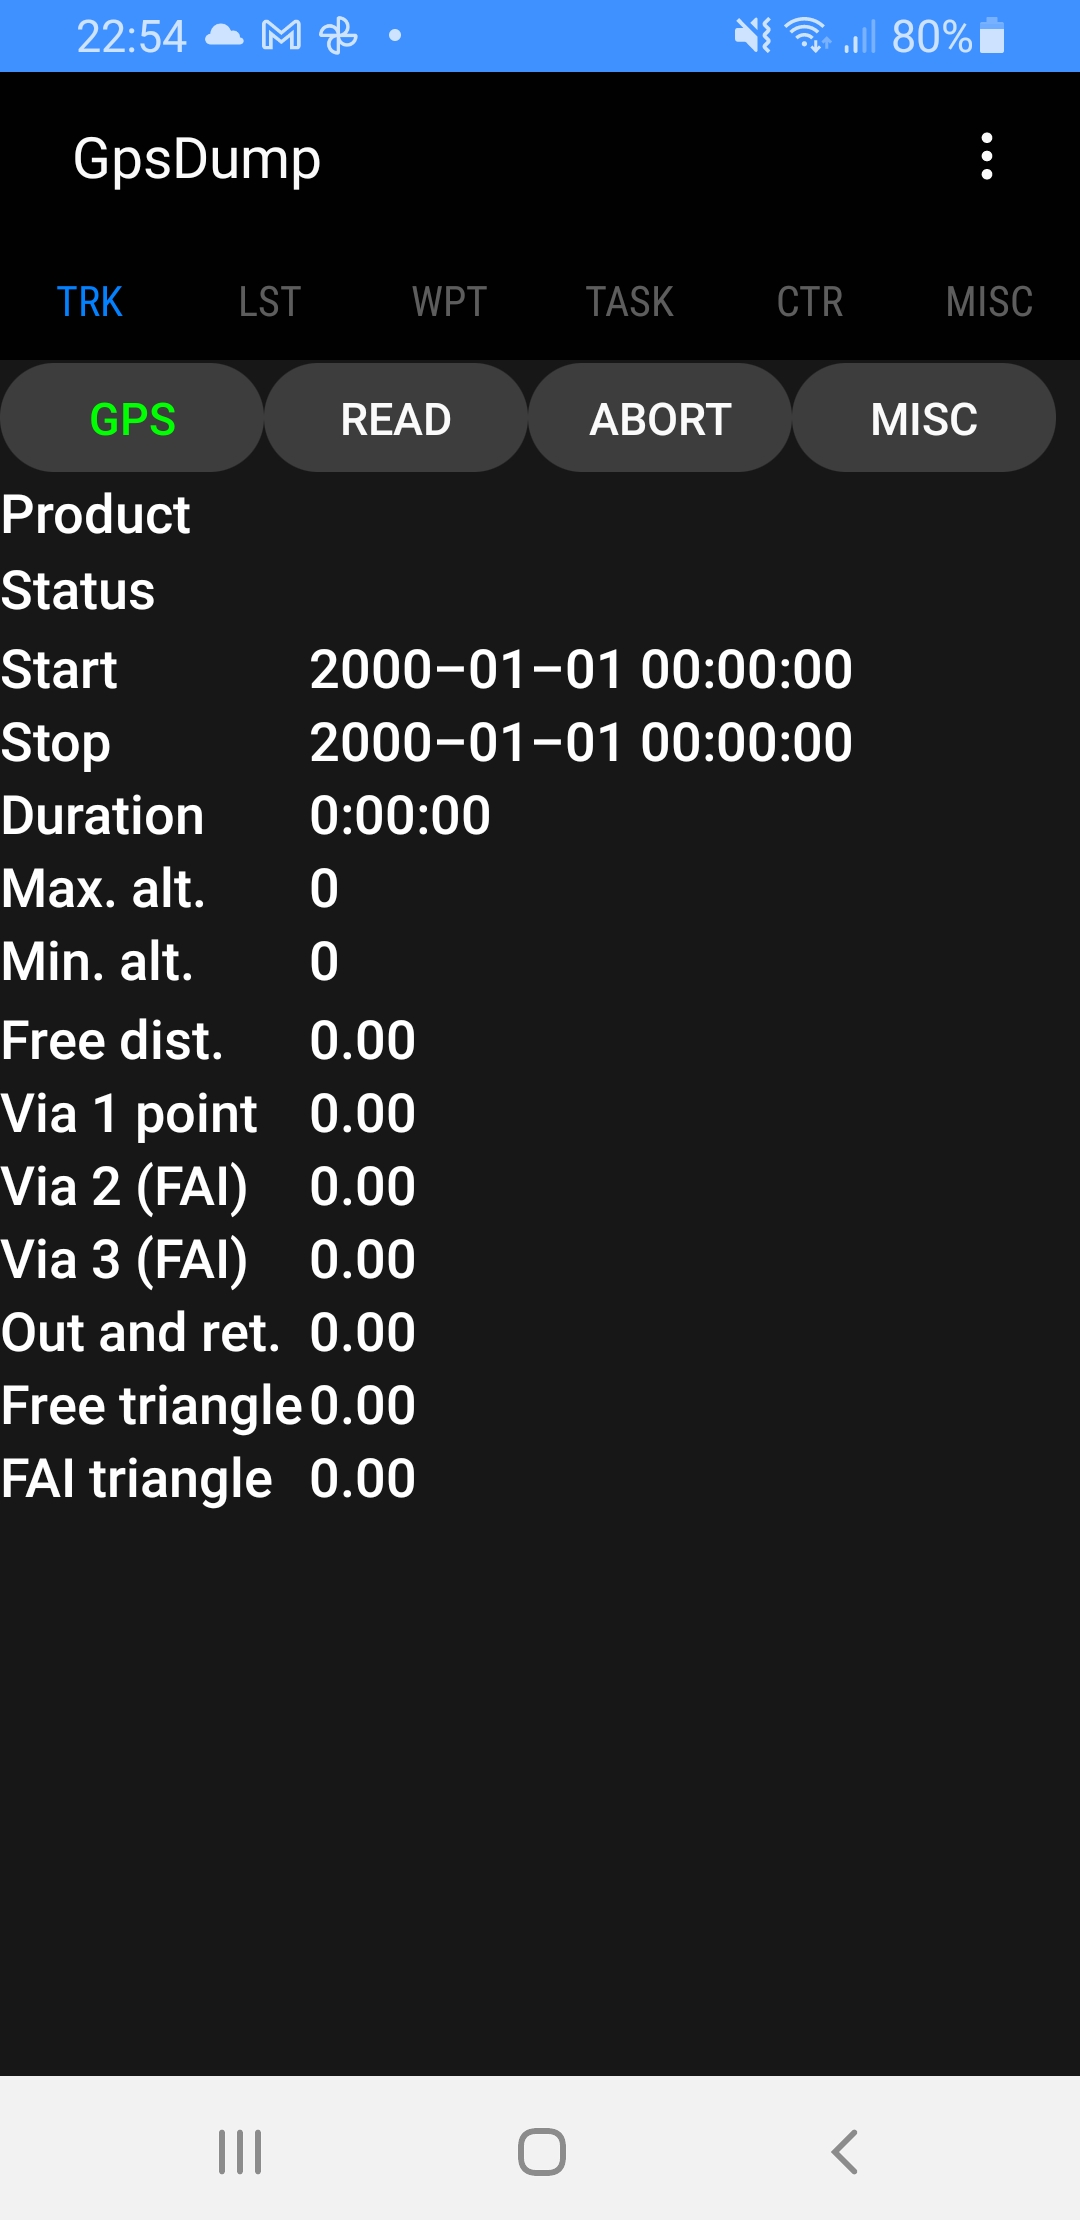
-
Then click on READ and select last option TzInstruments input
-
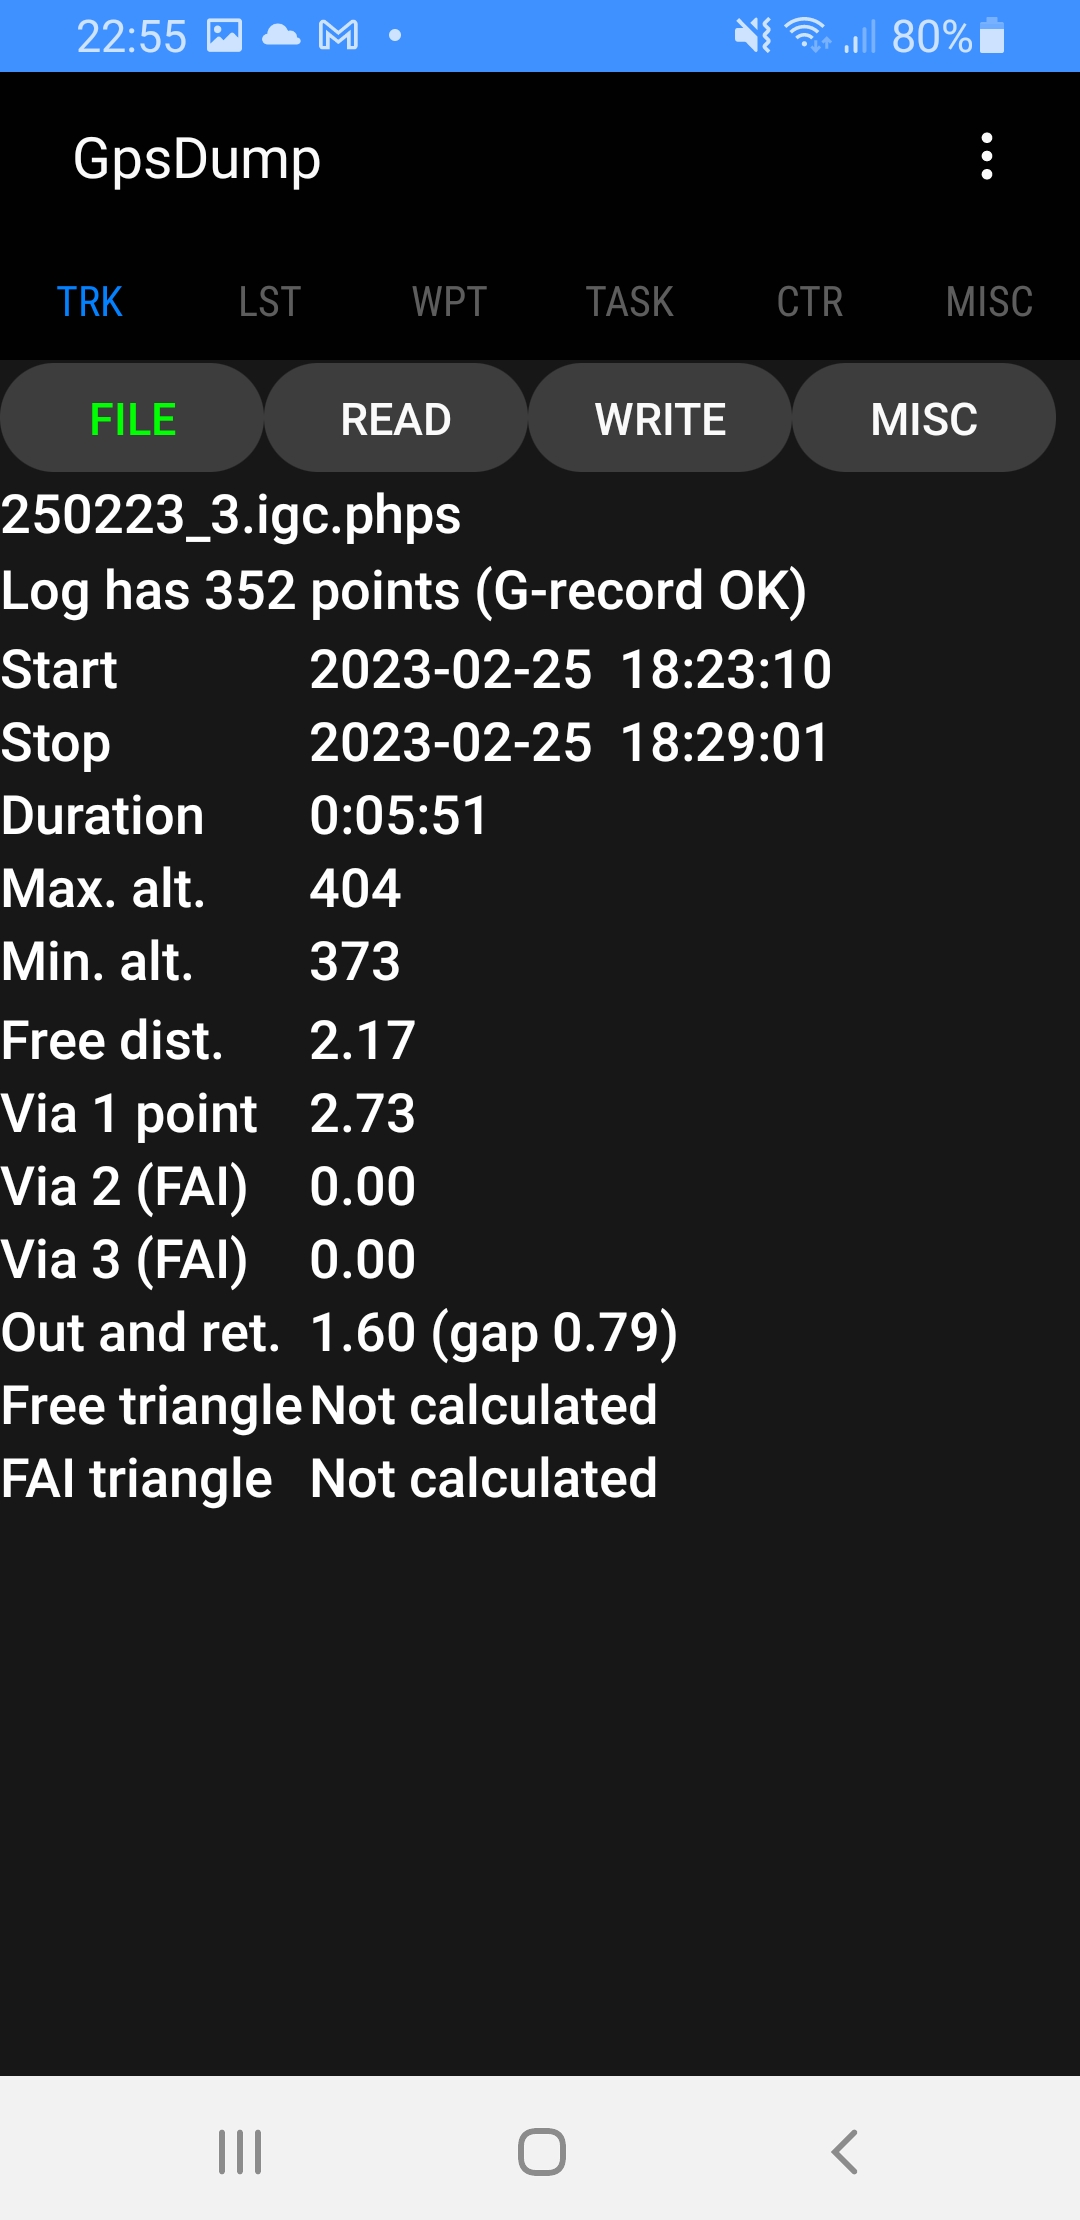
Select the IGC file you downloaded from TzI/TzIGx web interface onto your device

-
If the record has been saved correctly you then yous see a message like this with (G-record OK)
-
You can export directly to XContest with a click on MISC button and select Send to XContest
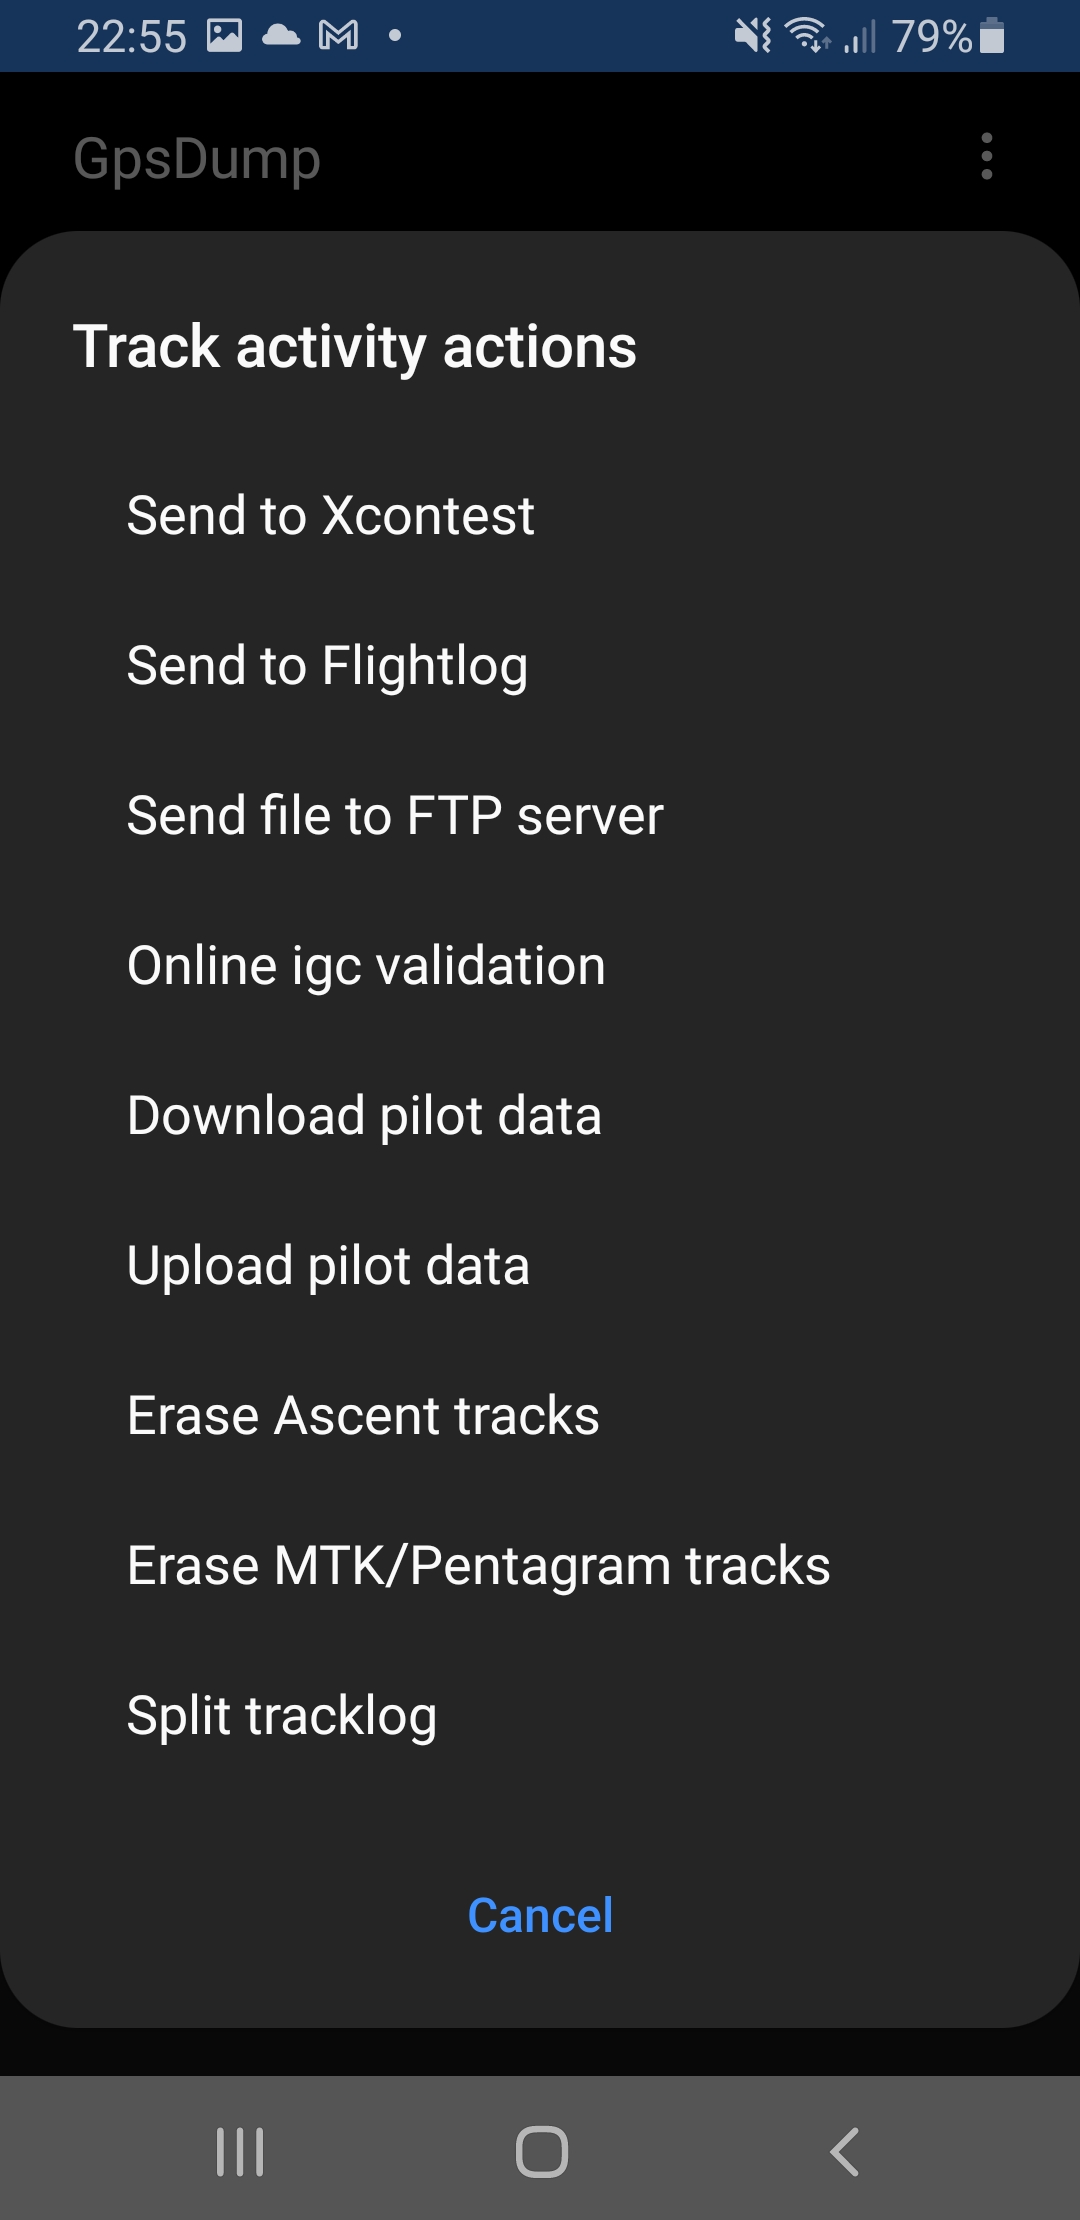
-
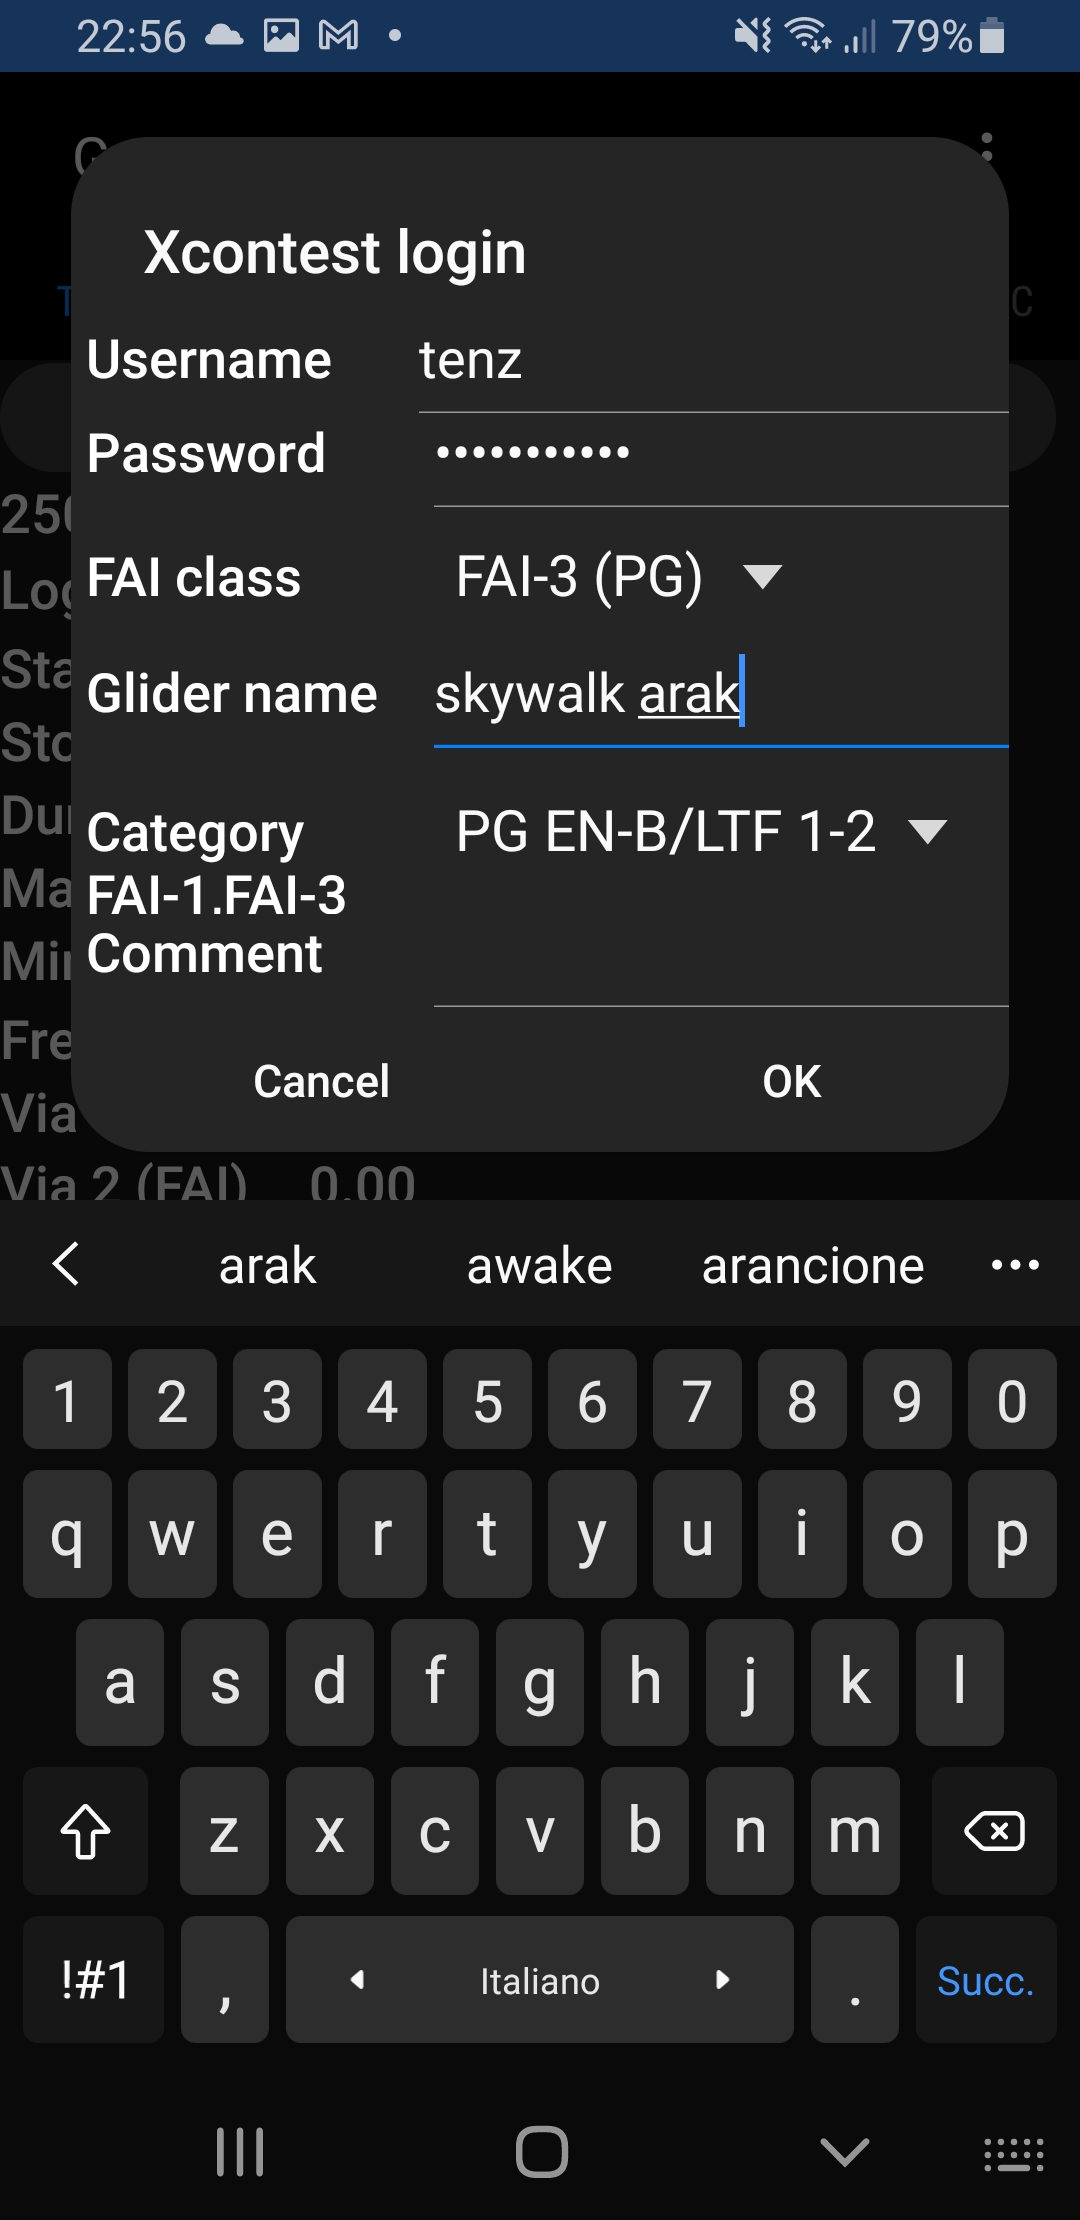
Here you can add more deatils and set your XContest acconut to upload the igc to your flight with then the OK button
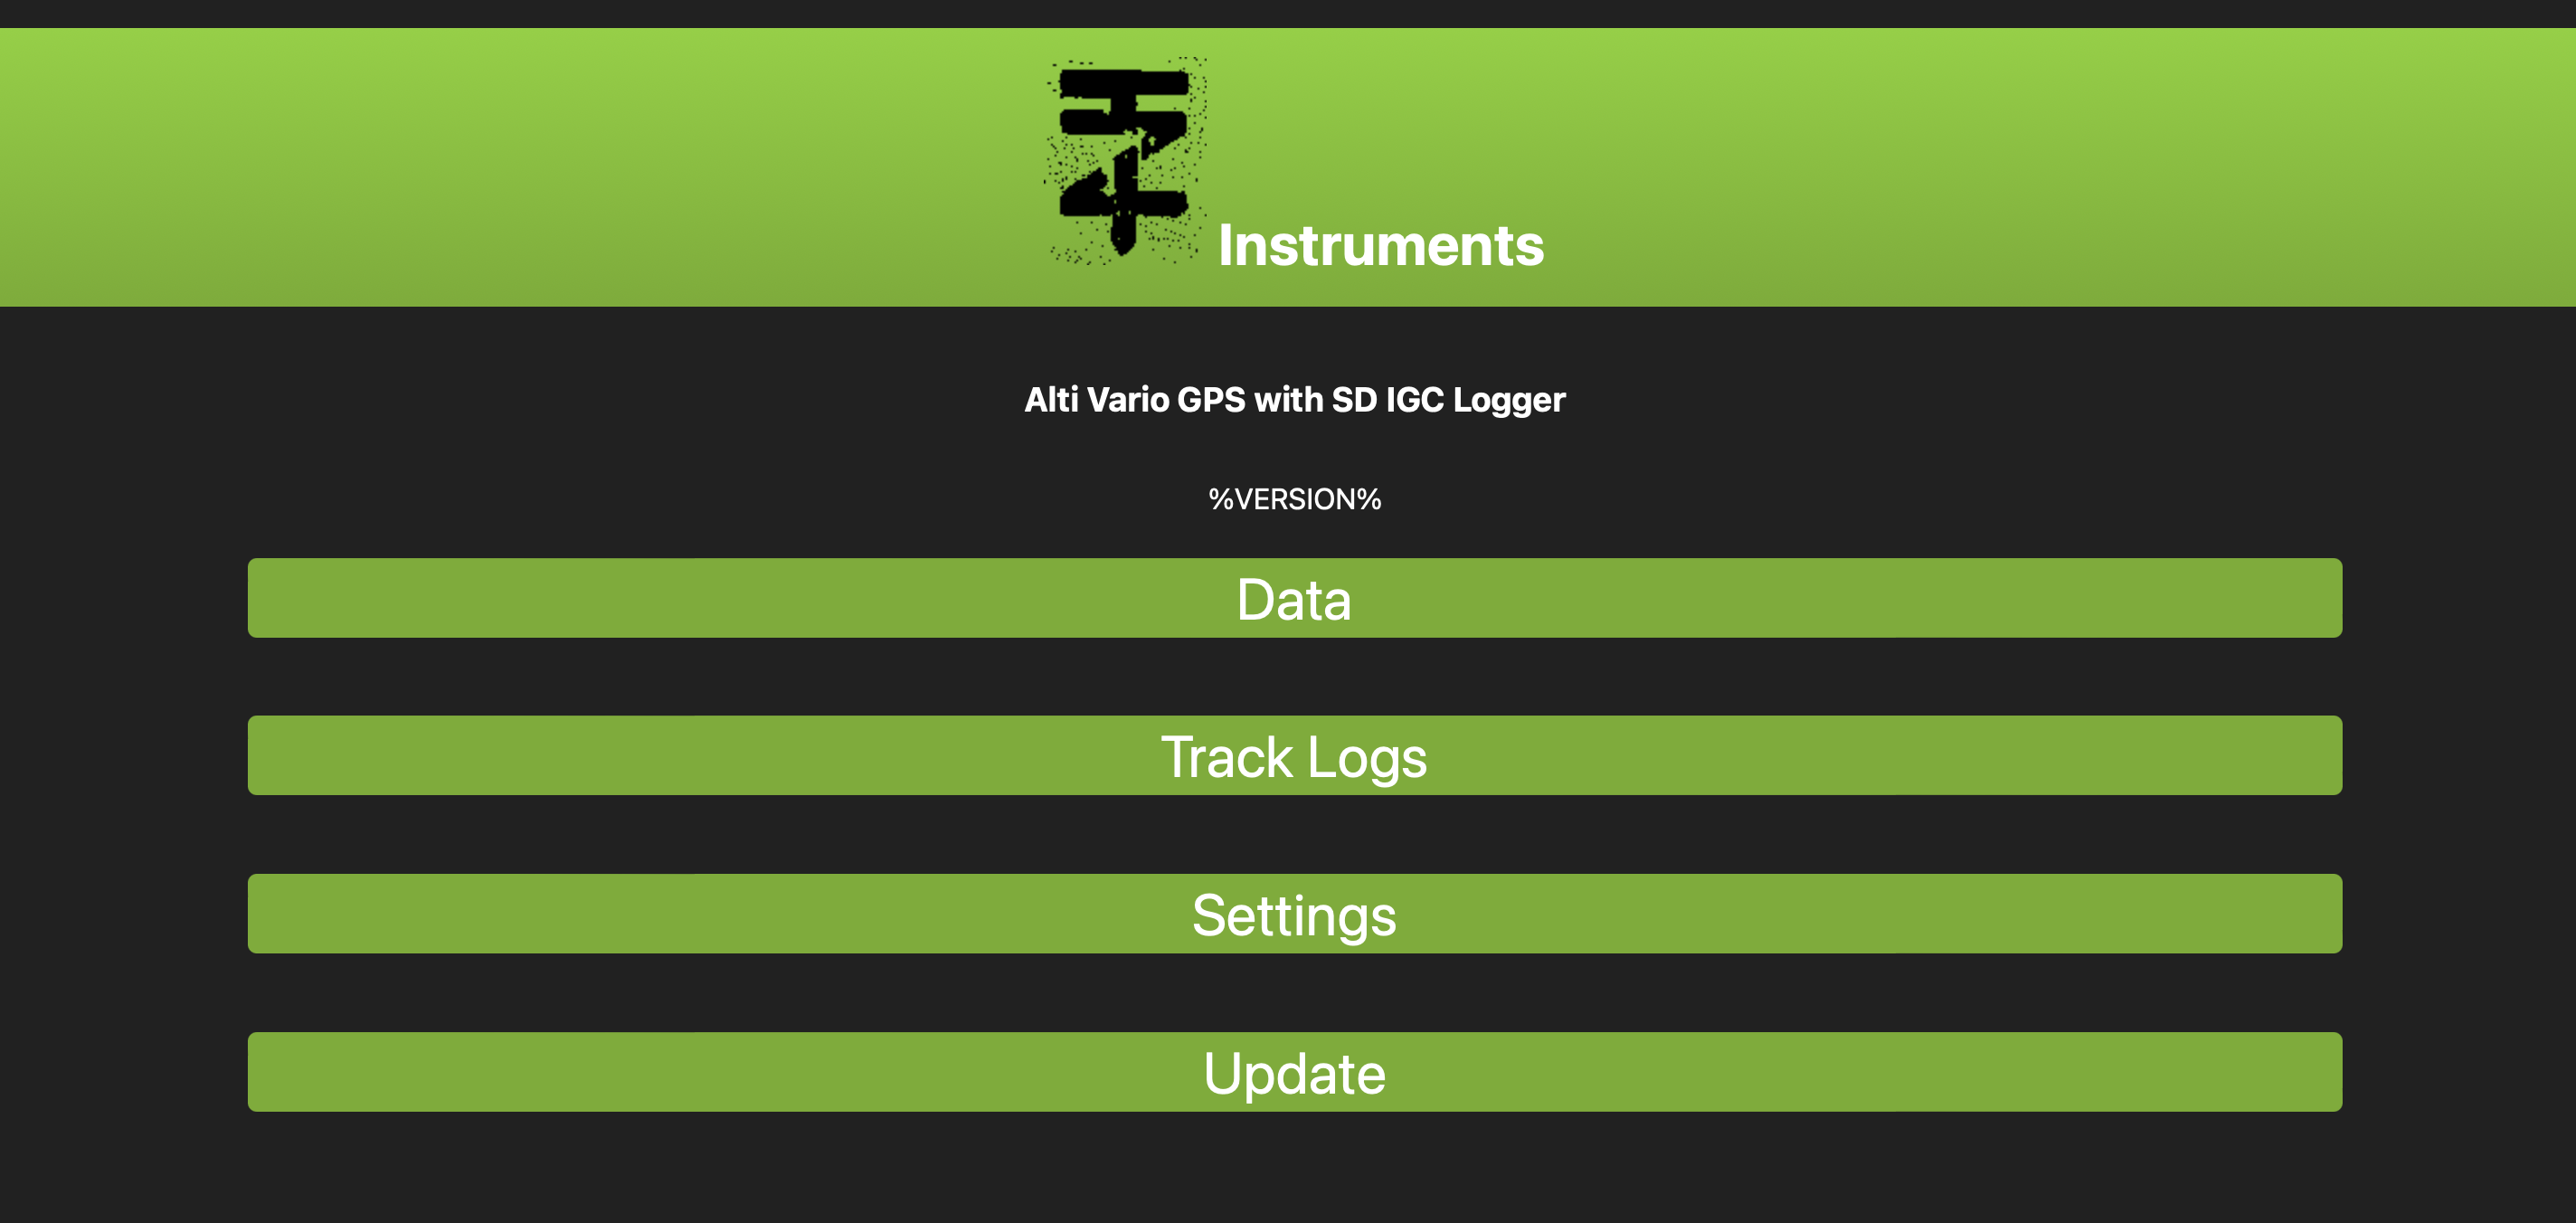
Wifi Configurator
All settings for TzI GPS vario are available on the web interface hosted on the device that is acessible enabling WiFi of the device.
Here below the procedure to enable and access the interface, while next paragraphs describes all web interface pages.
WiFi ON and web interface
- To configure TzI GPS Vario go to the third page, there you will see the WiFi status (should be OFF).
- Long press on the page button ( O ) to enable WiFi hotspot
- an IP ( 192.168.4.1 ) will appear and WiFi status now should be ON

- Connect to the Wifi hotspot on your phone/tablet/PC, search for TzI

- In your browser visit 192.168.4.1 and the main page of TzI settings will be visible.
Wifi: Data
This page reports just some data from the device in real-time:
- Device Id
- Running time
- GPS Time UTC+00
- Battery PIN VBAT
- Battery %
- Speaker Volume (0-255)
- Storage
- GPS Fix
- GPS Satellites
- GPS Altitude m
- Barometric Altitude m
- Temperature °C
- Pressure hPa
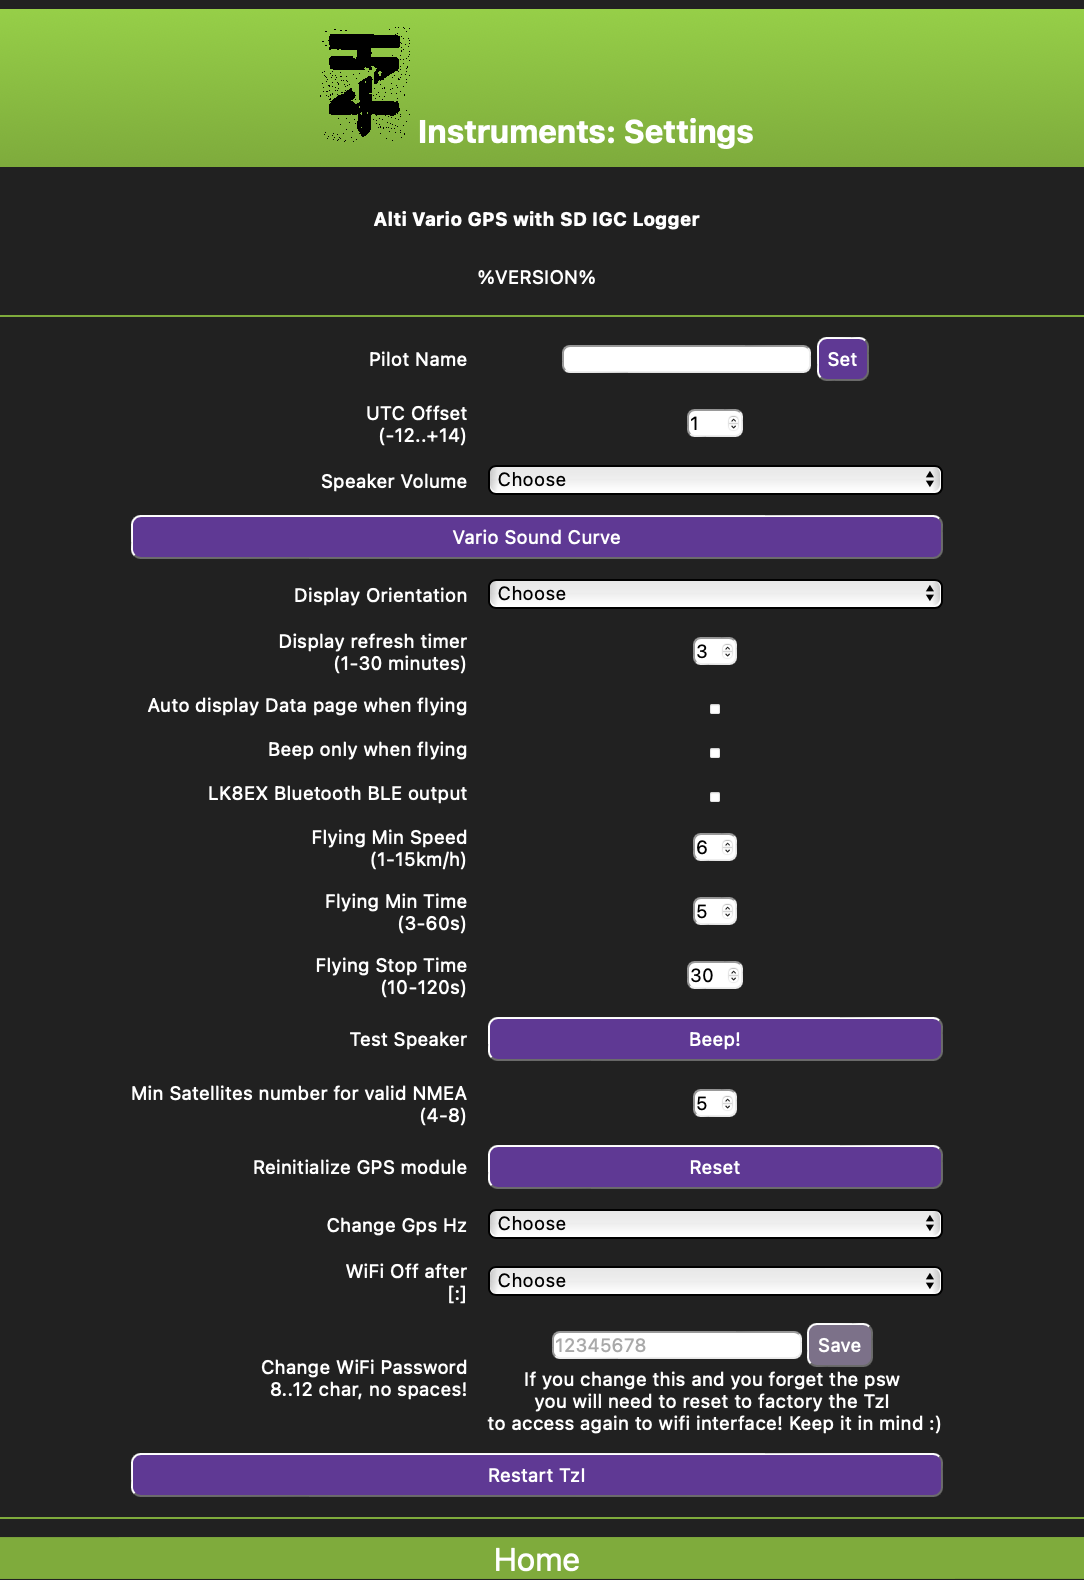
Wifi: Settings
In this page is possible to change several option of the device.
Note that default values are already set and optimized for better performances. If you change these you might experience some different behaviour of the device.
-
Pilot name: name that will be reported in the IGC track log if an SD is present.
-
UTC offset: time zone eg. ITA +1, to display correct time on eink display once got a GPS fix
-
Speaker Volume: change default speaker volume when device is powered on
-
Vario Curve: link to vario curve editor page, see next paragraph
-
Display Orientation: set display orientation, display can rotate 90 degrees all around
-
Display refresh timer: how oftern force eink refresh to clean ghost effect
-
Auto display Data page when flying: when checked the eink will display automatically page 2 (data) when the device detect fly status
-
Beep only when flying: if checked the buzzer will beep only when flying with speaker volume defined
-
LK8EX Bluetooth BLE output: if checked this will enable LK8EX format for BLE vario output sentence (needed for XCTrack for instance)
-
Flying Min Speed: Minimum speed required to detect flying status
-
Flying Min Time: Minimum time to detect slying status, this means that if a velocity greater that “Flying Min Speed” is detected for more than this amount of time than the device will be in flying status and start logging.
-
Flying Stop Time: Minimum time to detect stand status, i.e. if the velocity is less than “Flying Min Speed” for more than this time the device will stop logging and be set to stand status.
-
Test Speaker: just click to test if buzzer works, of course volume should be greater than 0%
-
Min Satellites number for valid NMEA: minimum number of satellites available to use, the more satellites the more accuracy in tracking. Optimal value seems to be 5. Track logs and gps altitude will be enabled only when you get this minimum number of satellites.
-
Reinitialize GPS module: reset of GPS module, click this if you can not get a gps fix even outside. Please notice that first gps fix can take 15/20 minutes.
-
Change Gps Hz: GPS module Hz sampling
-
WiFi Off after: default wifi timer once enabled. When expired the device will restart as normal with bluetooth enabled and wifi disabled.
-
Change WiFi Password: set here wifi interface password, default 12345678. If you change this and you forget the psw you will need to reset to factory the TzI to access again to wifi interface! Keep it in mind :)
-
Restart TzI: click this button to force the restart of the device. You might use this if you update the device and the automatic restart will not be performed.
Wifi: Vario Curve
In this page you can chage different settings of the vario sound.
The two option at the top define the sink rate value that enables the sound.
Eg.
Sink Start Beep: -2.5 m/s Lift Start Beep: 0.3 m/s
means that you will not hear the vario until the sink goes lower than -2.5 m/s or higher than 0.3 m/s.
The Vario Curve below allow to edit the sound curve for different variometer values. If you press “Test” button and the TzI volume is higher than 0 you can test directly the sound dragging the vario m/s value input slide bar and/or frequencies/duty/delay inputs.
“Export Curve” and “Import Curve” buttons allow to export the json configuraiotn of the curve that can be saved to file and shared with other people.
A good practice is to save the original or your favourite curve before editing a new one to be able to restore the default or previous configuration.
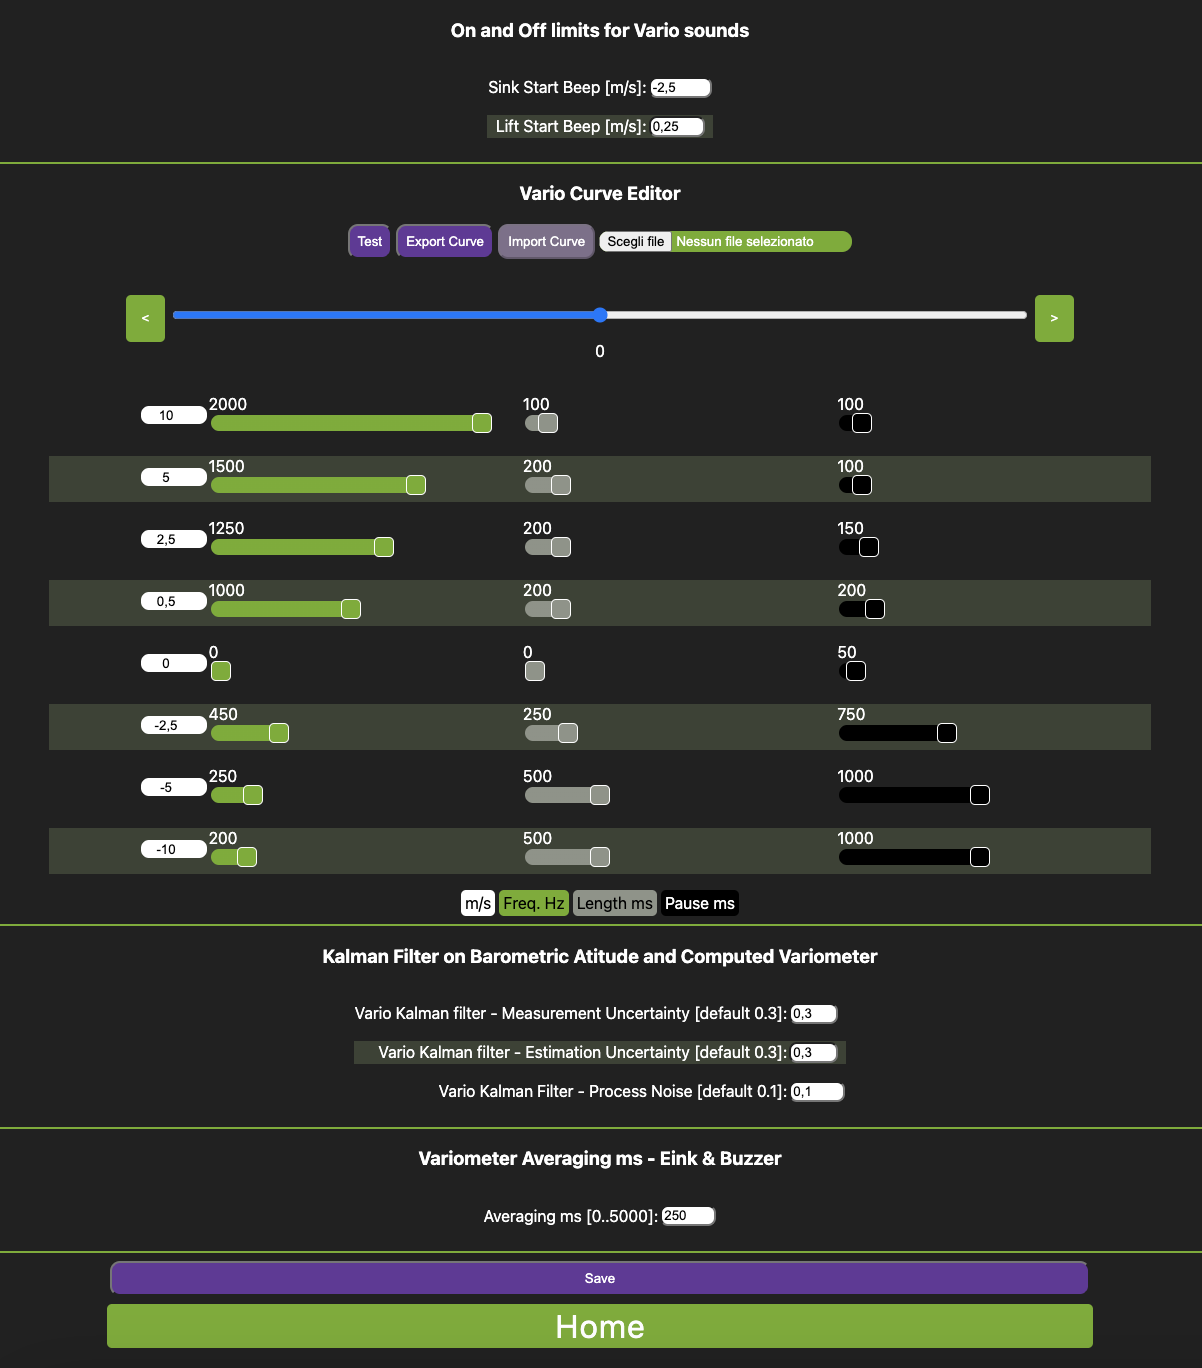
Kalman parameters
These parameters are used to filter and smooth vario raw data. Default values are the best results I found. Please change these if you know what you are doing and if you find a better configuration let me know! thanks!
Variometer Averaging ms (milliseconds)
Set here the averaging time for displayed and acoustic response. The higher the value, the smoother and delayed output will be displayed to eink and played to buzzer.
Note: vario data output sent to bluetooth and external instruments such as xctrack will not be affected by this average. i.e. the instrument send only raw data to bluetooth to let external devices to process data (xctrack for instance has already its own averaging algorithm and filters).
Wifi: Track Logs
In this page, if an SD Card is mounted, you can browse track logs of recorded flights and download them. The file format is .igc (not verified yet), meaning that you can download and visualize the track with free igc files viewers like e-logbook.org that does not ask for data validation.

I’m in the process of asking the validation of the IGC files to GPS Dump application, please be patient and finger crossed. Will update as soon as possible this documentation when the validation will be ready.
So in future it will be possible to download the IGC file with GPS Dump and export it to other application that requires the validation, such as XContest. A big thank to Stein S. for his time on this!
For SD Card management: See also SD Card paragraph.
Wifi Update Firmware
In this page you can update the firmware of the device to latest available that you find in this blog (see posts in main page).
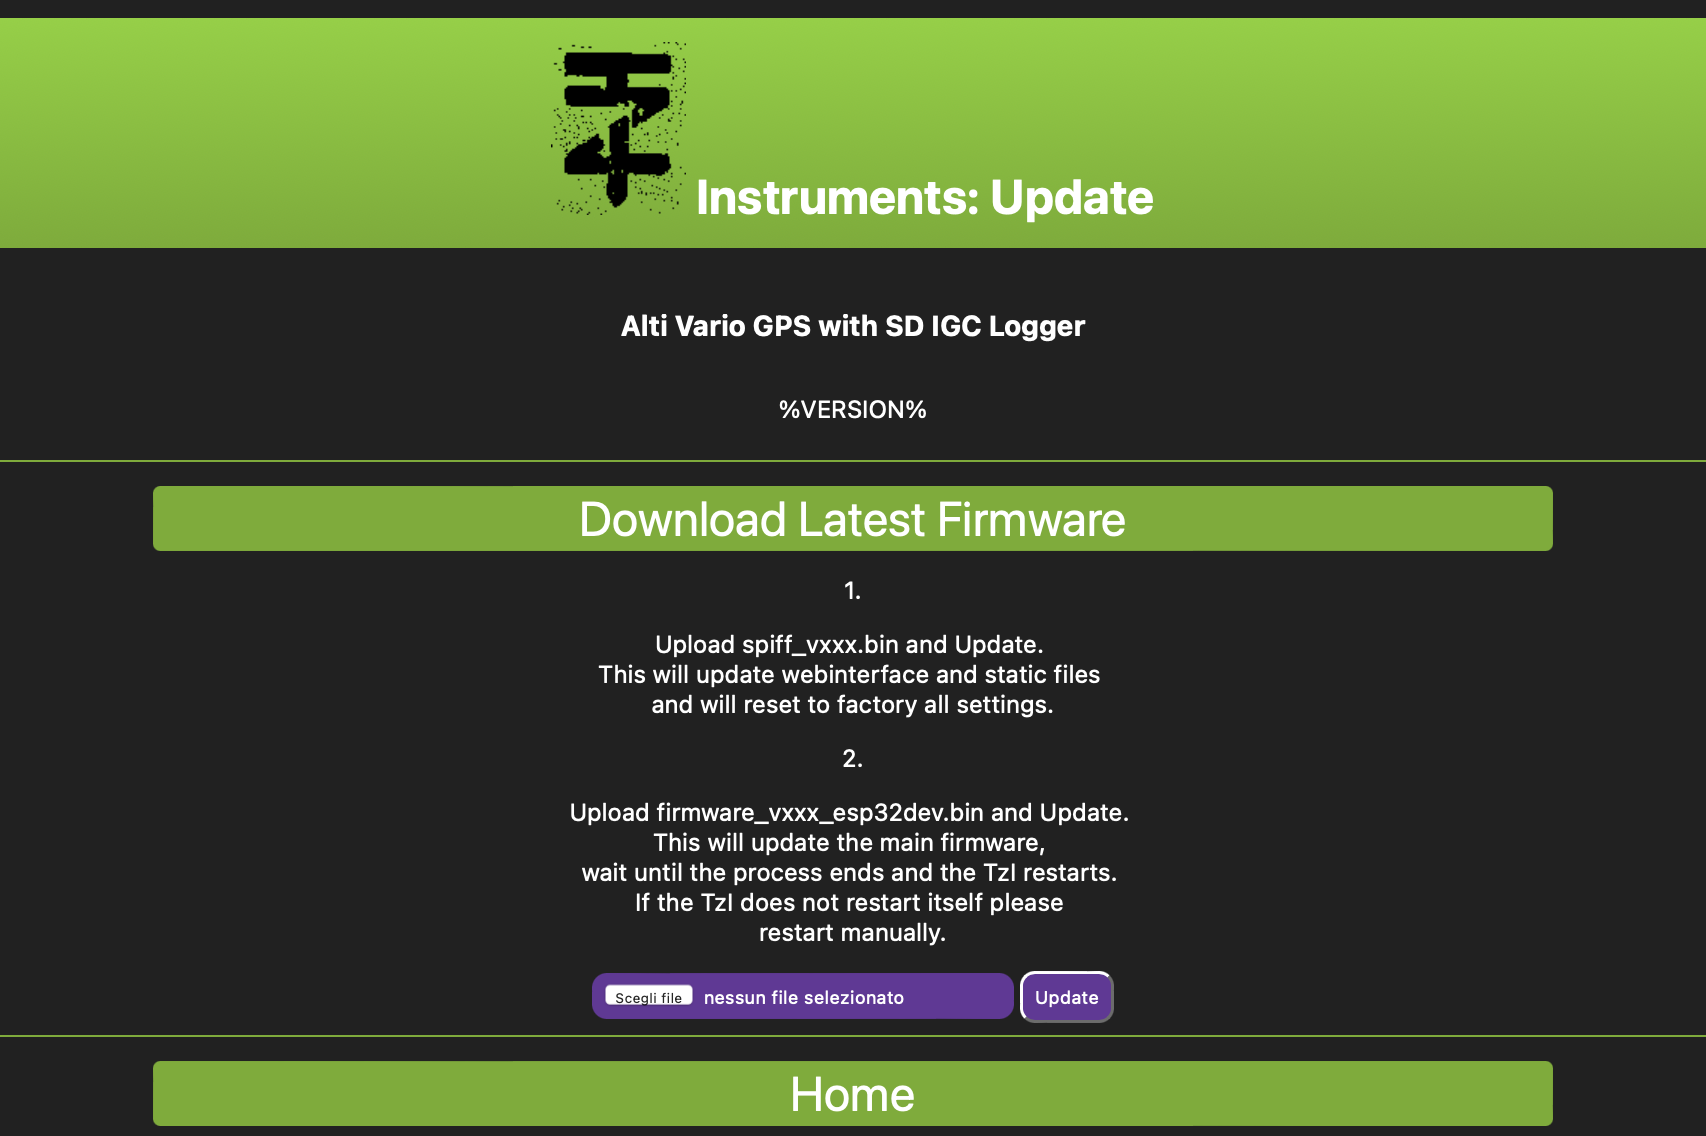
Once downloaded both SPIFFS and FIRMWARE binaries files, upload them separately form the interface. To perform a complete update you will need to upload both. SPIFFS file will not force a restart of the device while FIRMWARE after uploaded will restart autmatically the device to apply changes. If not restart manually the device but only once the upload ended (you will see a blank page with a message confirming that upload is finished).
Troubleshooting
Flashing Firmware
Main Firmware and Data can be flashed from the wifi interface as explained above but if something goes wrong in the process and your device gets stucked and stop working properly or does not power on after updates, it is possible to reset the device flashing firmware with USB connection. Here below the steps required to perform a complete refresh of the device connecting it to your PC/Mac/Linux.
Requirements:
- pyhton 3.x installed
- python esptool library
- usb data cable
1) create a folder and download there both FIRMWARE and SPIFF files from main releases
2) Create a virtual environment to install esptool locally in this folder
2.1) from created folder use this python command:

    ``` python3 -m venv venv ```

    this will create a folder "venv"
2.2) enable local virtual environment

    Mac/Linux

    ``` source venv/bin/activate ```

    Windows

    ``` venv/Scripts/activate.bat ```

Folder structure should look like this now:

/newfolder
    - /venv
    - firmware_vXXX_BOARD.bin
    - spiffs_vXXX.bin
3) Flashing firmware commands:
Finally to flash firmware connect your device with USB cable, set switch the power button ON and run these commands from your terminal inside created folder and virtual environment enabled.
Change Firmware and Spiffs version to current latest release.

**FLASHING FIRMWARE and SPIFFS**

esptool.py --before default_reset --after hard_reset write_flash 0x10000 firmware_vXXX_BOARD.bin 0x3D0000 spiffs_vXXX.bin

**FLASHING only SPIFFS**

esptool.py --before default_reset --after hard_reset write_flash 0x3D0000 spiffs_vXXX.bin